Did you know that I take watercolor painting lessons? Yep, I do, from Guy Magallanes in San Carlos. A few months back, I shared my first painting from those sessions, a pansy, and now, here is my third: a water lily. What do you think?
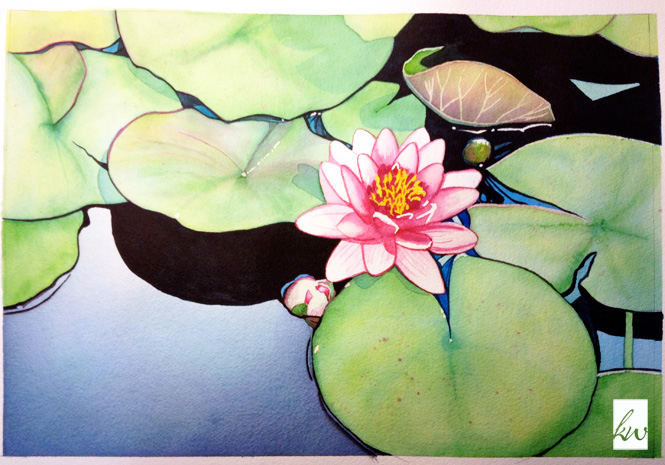
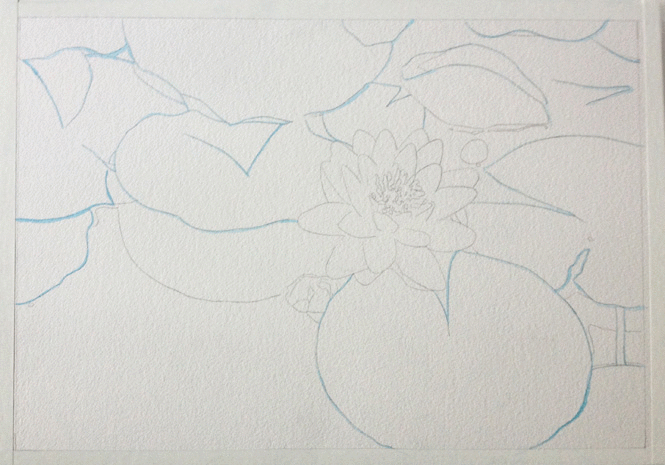
I’m pretty happy with it, given it’s my third painting and I’m still learning. Plus, I learned a new skill with this one: how to use sheeting frisket (that’s the plastic stuff you see in the animation below). Each of these first three paintings was guided step-by-step in my group class with Guy, but starting next week, I’m headed into the big girls’ class, where we select and paint our own inspirations. Yay!
After losing my photography mojo, I found that art and craft classes were a much-needed way to reinvigorate my lost creativity. I embarked on a whole series of lessons all over the world, from glassblowing and lampwork beadmaking in Hawaii to metal clay, jade carving, and traditional jewelry crafting in New Zealand. Eventually I tried painting in Australia, starting out with oils—which I discovered I don’t have the patience for—and winding up with watercolor back home in the San Francisco Bay Area.
You may be asking why, after all of those artistic adventures, watercolor is the one that stuck. One reason: It feels like play. While I’ll always appreciate the beauty of blown glass, the intricacy of lampwork, and the craftmanship of jewelry making, watercolor is the process I enjoy most. I can dabble and experiment and relax into it—and it’s always fun. When it comes to art right now, that’s what I need most: A creative outlet that’s easy and undemanding and enjoyable.
Here’s an animation to show you how a watercolor painting comes together:
What have you been doing to fuel your creative fire lately?

 It’s been quite a while since I’ve had chocolate lava cake, my old-time favorite dessert. Its absence from my life is a result of sugar-free living. (I’ll explain the whys and wherefores to you soon but, for now, suffice it to say that I’m very careful about ingesting sugar and sugar substitutes, and I generally avoid cakes, cookies, muffins, scones and any other kind of sugar-filled treat. That stuff is not food anyway, but I digress…) Normally the sugar-free lifestyle suits me perfectly and I rarely miss the sugar. Recently, however, I’ve been feeling a bit deprived. It’s fall and we’re entering the holiday (aka fattening up) season. Friends are posting recipes for sugar-filled treats on their blogs. So, hubby and I decided it was time to try out some sugar-free recipes. I found inspiration at Healthy Indulgences, and referred back to her inspiration at AllRecipes as well. My culinary hubby then helped me make substitutions better suited to our diet and to items we had on hand. I’m practically helpless in the kitchen, truth be told. This recipe was a breeze, however, and the results were OMG GOOD. Caution: This recipe is for dark-chocolate connoisseurs only. Chocolate Lava Cake for Two Ingredients: 1/4 cup (1/2 stick) butter, salted 2 ounces of 72% dark chocolate 1 egg, left at room temperature 1 teaspoon flour 1/4 teaspoon stevia A splash of vanilla extract (about 1/4-1/2 teaspoon) Directions: Preheat oven to 450 degrees Fahrenheit. Microwave butter and chocolate in a Pyrex bowl or measuring cup, 1-2 minutes. Add egg and beat until smooth. Add flour, stevia and vanilla extract, and mix well. Pour contents into one or two oven-safe ramekins, and bake until batter puffs up but centers are moist (6-8 minutes). Remove from the oven and eat while warm. Yum! Hubby and I both thought the cakes were delish straight from the oven, but he made his even better with a dollop of plain yogurt from the fridge. Enjoy, It’s been quite a while since I’ve had chocolate lava cake, my old-time favorite dessert. Its absence from my life is a result of sugar-free living. (I’ll explain the whys and wherefores to you soon but, for now, suffice it to say that I’m very careful about ingesting sugar and sugar substitutes, and I generally avoid cakes, cookies, muffins, scones and any other kind of sugar-filled treat. That stuff is not food anyway, but I digress…) Normally the sugar-free lifestyle suits me perfectly and I rarely miss the sugar. Recently, however, I’ve been feeling a bit deprived. It’s fall and we’re entering the holiday (aka fattening up) season. Friends are posting recipes for sugar-filled treats on their blogs. So, hubby and I decided it was time to try out some sugar-free recipes. I found inspiration at Healthy Indulgences, and referred back to her inspiration at AllRecipes as well. My culinary hubby then helped me make substitutions better suited to our diet and to items we had on hand. I’m practically helpless in the kitchen, truth be told. This recipe was a breeze, however, and the results were OMG GOOD. Caution: This recipe is for dark-chocolate connoisseurs only. Chocolate Lava Cake for Two Ingredients: 1/4 cup (1/2 stick) butter, salted 2 ounces of 72% dark chocolate 1 egg, left at room temperature 1 teaspoon flour 1/4 teaspoon stevia A splash of vanilla extract (about 1/4-1/2 teaspoon) Directions: Preheat oven to 450 degrees Fahrenheit. Microwave butter and chocolate in a Pyrex bowl or measuring cup, 1-2 minutes. Add egg and beat until smooth. Add flour, stevia and vanilla extract, and mix well. Pour contents into one or two oven-safe ramekins, and bake until batter puffs up but centers are moist (6-8 minutes). Remove from the oven and eat while warm. Yum! Hubby and I both thought the cakes were delish straight from the oven, but he made his even better with a dollop of plain yogurt from the fridge. Enjoy, Update November 18, 2012: I’ve tried this recipe a few more times and I don’t think it needs the stevia. If you are a dark chocolate fan, the chocolate will provide enough sweetness so you can skip any additional. Try it out and let me know what you think! You can also substitute almond flour for regular flour, but if you do, you’ll want to back off on the butter a bit so it’s less greasy. Update November 18, 2012: I’ve tried this recipe a few more times and I don’t think it needs the stevia. If you are a dark chocolate fan, the chocolate will provide enough sweetness so you can skip any additional. Try it out and let me know what you think! You can also substitute almond flour for regular flour, but if you do, you’ll want to back off on the butter a bit so it’s less greasy.
I recently began taking painting lessons with San Carlos watercolor artist, Guy Magallanes. During July, we completed what Guy called “The Pansy Project.” Sounds like a clandestine operation, doesn’t it? Not quite, but we usually have so much fun during class that it could have been one.
Want to paint along? Here’s what you’ll need:
Guy usually puts step-by-step instructions for the current project on his website, but since we’ve moved on from the pansy, I’m going to have to look back at my in-progress snapshots and try to remember what we did in broad brushstrokes.
Step 1: Roughly trace the outline of a pansy on your watercolor paper.
Step 2: With Transparent Yellow, paint in the heart of the bottom petal, wet on dry.
Step 3: Working wet on wet, selectively add Permanent Rose to each petal (we were painting from a photograph, but I think we all needed Guy’s guidance on where to put in the rose, so I think you’ll be better off looking at the sample paintings for help). Remember to preserve your white highlights in the center of the flower. (Image: Top left)
Step 4: Continuing to work wet on wet, fill in the background with Thalo Blue and begin adding dimension to each petal. (Image: Top right)
Step 5: With Thalo Blue, begin adding veining to each petal. You will be working wet on dry, with very creamy paint. You start with your brush flat to the paper, then pull towards you, lifting the brush as you go, so the vein trails off. (Images: Bottom left and right)
Step 6: Add some Thalo Blue to the very center of the flower to create depth (on top of the yellow, it turns green).
Step 7: Do a full wash of Winsor Violet across the flower.
Step 8: Working wet on dry, add Transparent Yellow to the background to get green leaves and stem.
Step 9: Once dry, add Winsor Violet to darken and separate the leaves from the background.
Step 10: Working wet on dry, add Winsor Violet to smooth out and separate the petals, as desired.
Ten steps may not seem like a lot (or maybe it does when you read through the steps), but remember we did this very deliberately over four weeks. Some of us (myself included) even finished up at home after class four.
Here are the results from our class: And, here’s a look at what the completed painting is supposed to look like (Guy-style). Having seen my work-in-progress above, which of the completed paintings do you think is mine? From left to right, A, B, C, or D? Scroll down for your answer.
Keep going…
Almost there……………
Here’s your answer:
The answer is C.
Did you guess correctly? Let me know in the comments.
Thanks,
For the past couple of years, I’ve experimented with living sugar free. And by sugar free, I don’t mean using sugar-free syrups and so-called “diabetic friendly” sweeteners. I mean, adding zero sugar or sugar substitutes to my food.
Therefore, when my 35th birthday came around this year, I wanted some no-sugar-added carrot cupcakes and my culinary hubby was happy to oblige. We started with a recipe for a baby’s smash cake that I found on Things for Boys and changed it up just a bit to make it more adult-friendly. Here’s the result:
And here’s our adapted recipe:
Sugar-free Carrot and Date Cupcakes (makes 8″ cake or 12 cupcakes)
Ingredients:
- 1 2/3 cup plain flour
- 3 tsp baking powder
- 1 stick butter, melted
- 1 tsp ground nutmeg
- 1 tsp ground cinnamon (we substituted 2 tsp pumpkin pie spice for both nutmeg & cinnamon)
- 5 oz dates, finely chopped
- 4 oz raisins
- 2 oz shredded coconut (we used fresh coconut but you could also use a package)
- 1/3 cup walnuts
- 1 cup grated carrot (about 1 large carrot)
- 2 tbsp milk (we used Westsoy unsweetened vanilla soy milk)
- 2 eggs, lightly beaten
- Plain Greek yogurt for topping (optional)
Preheat oven to 300°F. Lightly grease your cake or muffin pan.
Sift the flour, baking powder and ground spices together. Make sure it’s evenly combined. Stir in the dates and coconut.
Combine the melted butter, raisins, carrot and milk. Add to the dry ingredients and mix gently until evenly combined. You should have a very thick mixture. Add the eggs and give it a good stir.
Spoon into the prepared pan and bake for 45 – 60 minutes (about 30 mins for cupcakes) until toothpick comes out clean.
Remove from the oven and allow to cool for 5 minutes, then turn onto a wire rack to cool completely.
Enjoy as they are, or scoop a dollop of plain Greek yogurt on top for a creamier mouth feel.
|


On Creative Recovery and the True Self » KateWatson.net - […] photographers avoid the pit I’d fallen into and, on a more personal note, I found a love for watercolor painting and other new creative […]
Painting #3: Water Lily » KateWatson.net - […] Guy Magallanes in San Carlos. A few months back, I shared my first painting from those sessions, a pansy, and now, here is my third: a water lily. What do you […]